Posts

Showing posts from October, 2014

Running cherrymusic as a service in Ubuntu 14.04 with Supervisord

In the previous blog post, I showed you how to run a music streaming service on your computer: http://iambusychangingtheworld.blogspot.com/2014/10/build-your-own-music-streaming-website.html Today, I will guide you how to setup cherrymusic as a service using Supervisord . I love Supervisord! I got some trouble getting cherrymusic to work with Supervisord: * I first tried running cherrymusic with Python2: when clicking to the "browse files" link, it said that cannot browse files and throw this error in the backend: UnicodeDecodeError: 'ascii' codec can't decode byte 0xec in position 1: ordinal not in range(128) * Then, I switched to Python3 and also got errors, but this time, it is a fixable issue:   cherrymusic can list my albums but when I clicked to one of the album, it through this error: ... UnicodeEncodeError: 'utf-8' codec can't encode character '\udcc3' in position 7: surrogates not allowed this is a Python3's bug: h

Build your own music streaming website with cherrymusic

Image
So I heard that you want to build a music streaming website and share your music with friends? Oh right, oh right, oh right, here you go: Cherry Music: Official website:   http://www.fomori.org/cherrymusic/ Github repository:   https://github.com/devsnd/cherrymusic 1. Install dependencies and all extra codec libs: $ sudo pip install cherrypy $ sudo apt-get install vorbis-tools flac lame  imagemagick Note: If you get into trouble when installing imagemagick, please read this forum thread for the resolution:  http://askubuntu.com/questions/471045/14-04-doesnt-have-package-imagemagick 2. Clone the cherrymusic repository: $ git clone https://github.com/devsnd/cherrymusic.git 3. Start the server: $ cd cherrymusic $ python cherrymusic --setup --port 8080 4. Open your browser, go to   localhost:8080, and s et the initial configurations including: * Media base directory * Server port ... Then click Save... and Create admin user:   5. Login using the acco

Nginx "Connection refused" error when setting upstream as localhost

For some reason, I checked out the nginx error log last night and got this error: 2014/10/28 06:53:54 [error] 5437#0: *28 connect() failed (111: Connection refused) while connecting to upstream, client: 192.168.1.3, server: my.domain.com, request: "GET /staff/acts/report-by-acts/ HTTP/1.1", upstream: " http://[::1]:8080 /staff/acts/report-by-acts/", host: "my.domain.com", referrer: "http://my.domain.com/staff/families/all/" But my web application is still working properly. What happened? Where was the problem? I looked into the nginx configuration and found that I set upstream server of that app as localhost: upstream asa {     server localhost :8080 fail_timeout=0; } So, I changed the server directive to 127.0.0.1, restart nginx, and the error gone away: upstream asa {     server 127.0.0.1 :8080 fail_timeout=0; }

Hide a particular user from the Lightdm login screen in Ubuntu 14.04

In Ubuntu 14.04, to hide a particular user from the LightDM login screen is a little bit tricky because of this bug since 2011: https://bugs.launchpad.net/ubuntu/+source/accountsservice/+bug/857651 Here is a workaround: 1. Open /etc/lightdm/users.conf: $ sudo nan /etc/lightdm/users.conf 2. Add the user you want to hide to this line (let's call it trinh): hidden-users=nobody nobody4 noaccess trinh 3. Change the uid of that user to under 500: $ sudo usermod -u 499 trinh 4. Reboot

Managing your wordpress sites in command-line with wp-cli

Earlier today I was trying to reset my wordpress admin password using the method mentioned  here , but got no luck. So, I's looking around the Internet and found this super great tool names wp-cli : http://wp-cli.org/ It is a set of command-line tools for helping you to manage your wordpress installations. You can do a lot of things using wp-cli, such as: * Reset users password. * Install plugin * Or even create or delete blog posts. To install wp-cli: 1. Login to your server using a sudo user (not root) 2. Download wp-cli.phar: $ curl -O https://raw.githubusercontent.com/wp-cli/builds/gh-pages/phar/wp-cli.phar 3. Check if it works: $ php wp-cli.phar --info 4. To be able to type just wp, instead of php wp-cli.phar , you need to make the file executable and move it to somewhere in your PATH. For example: $ chmod +x wp-cli.phar $ sudo mv wp-cli.phar /usr/local/bin/wp 5. Intall tab completion for wp-cli: $ wget https://github.com/wp-cli/wp-cli/raw/master/u

Debugging varnish's configuration

Sometimes, I try to modify varnish's configuration /etc/varnish/default.vcl, something like adding new backends, turning on/off caching for a specific backend... Then I have to reload varnish: # service varnish reload but it fail! Reloading HTTP accelerator: varnishdCommand failed with error code 106 without saying anything else, I meant which part of the configuration caused that error? Fortunately, there is a command to debug varnish's configuration: # /usr/sbin/varnishd -Cf /etc/varnish/default.vcl Message from VCC-compiler: Expected one of         'acl', 'sub', 'backend', 'director', 'probe',  or 'import' Found: 'v' at ('input' Line 473 Pos 1) v#     </address> #---------------- It shows me exactly where I should go back and fix. Quite convenient!

How to get out of the maintenance mode of Wordpress after failed plugin upgrade

This morning, I was trying to upgrade some plugins on my Wordpress blog. The process failed and the whole site showing this message: "Briefly unavailable for scheduled maintenance. Check back in a minute." I tried to refresh the page, nothing happen. The blog's frozen there. So, to get out of the maintenance mode of Wordpress, just delete the .maintenance file in the root folder of the wordpress blog. For example: $ sudo rm /var/www/wordpress/.maintenance

Secure your servers from POODLE (SSLv3) attacks

Image
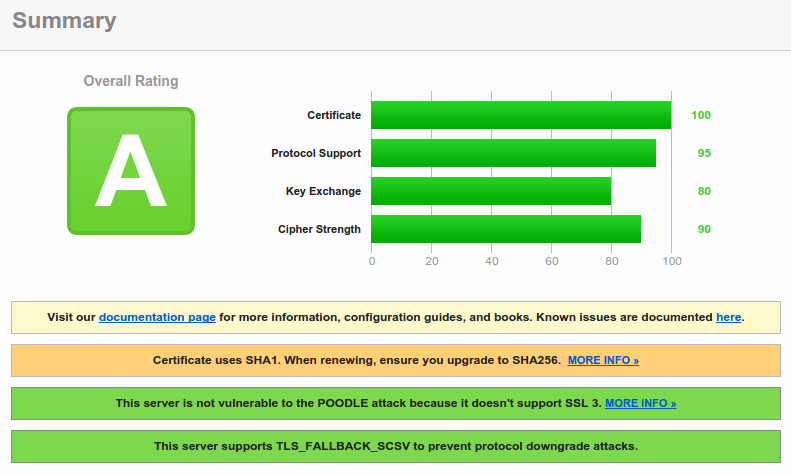
I guess you all heard of the recent SSLv3 vulnerability or POODLE a couple days ago. It is a protocol flaw issue so It will affects every implementation of SSLv3. To understand more about this exploit, please read: White paper:  https://www.openssl.org/~bodo/ssl-poodle.pdf StackExchange discussions:  http://security.stackexchange.com/questions/70719/ssl3-poodle-vulnerability There are already a lot of instructions on how to harden your servers and clients to prevent this kind of attack available on the Internet. Here is a short one I'm using for my servers: 1. nginx: * Create a configuration for ssl /etc/nginx/conf.d/strong-ssl.conf with the following content (disable SSLv3 and use strong ciphers): ssl_protocols TLSv1 TLSv1.1 TLSv1.2; ssl_prefer_server_ciphers on; ssl_ciphers "EECDH+ECDSA+AESGCM EECDH+aRSA+AESGCM EECDH+ECDSA+SHA384 EECDH+ECDSA+SHA256 EECDH+aRSA+SHA384 EECDH+aRSA+SHA256 EECDH+aRSA+RC4 EECDH EDH+aRSA RC4 !aNULL !eNULL !LOW !3DES !MD5 !EXP !PSK

Parent Single Log-In with PowerSchool - Part I

Image
Part I - Overview, Create or Update PowerSchool Parent accounts using PHP cURL Earlier this year I had a chance to work on a project which is creating a Single Log-In system for Parents using the PowerSchool data. Unlike other kind of users in PowerSchool (Students, Teacher) Parents cannot be bind to an Active Directory server (Yes, my life would be easier if they support LDAP for Parent accounts!), they are stored in a separate place in the database. After searching around for a while, I recognized that the only way for me to build a Single Log-In system for Parents is using the PowerSchool API and implement the SAML 2.0 protocol. The purpose of PowerSchool supporting this protocol is for developers to create a Single Sign-On layer for customized apps to use PowerSchool as an Identity Provider . To learn the PowerSchool API and to implement the SAML protocol which I never heard before is not a big deal to me as a developer, but in the limited amount of time, I was not sure i

A few notes when upgrading my Django project to v1.7 from v1.5

Here are something I want to take notes when upgrading my project to the latest version of Django, v1.7 from v1.5. 1. Model Form and Model Formset: I have to explicitly declare which fields of the model I want to include in or exclude from the form. For example: # all fields of the model class MyForm(ModelForm): class Meta: model = MyModel fields = '__all__' # some fields only class MyForm(ModelForm): class Meta: model = MyModel fields = ('first_field', 'second_field') # or exclude these fields class PtcPeriodForm(ModelForm): class Meta: model = PtcPeriod exclude = ('third_field', 'fourth_field') # formset MyFormSetBase = modelformset_factory( MyModel, extra=0, fields = ('first_field','second_field') ) # inline formset MyInlineFormSetBase = inlineformset_factory( MyModel, MySubModel, can_delete=True, fields=('some_field', 'another_field') ) 2. Default te

Filter ManyToMany field's choices in a Django ModelForm

In my current project, I'm required to build a form in which a certain user group can only create with a certain kind of data. For example: User 1 of group A can only create Teacher objects with a set of students (student_numbers, let say ['123', '234']) User 2 of group B can only  create Teacher objects with a set of students (student_numbers, ['345', '678']) Here is what the model looks like: models.py: from django.db import models class Student (models.Model): student_number = models.CharField(max_length = 6, primary_key = True) student_name = models.CharField(max_length = 20) def __unicode__(self): return self.student_name class Meta: ordering = ['student_number'] class Teacher (models.Model): name = models.CharField(max_length=50) students = models.ManyToManyField(Student) def __unicode__(self): return u'%s' % (self.name) class Meta: ordering = ['name'] verbose_name = &qu

A note on HttpResponseRedirect with pagination in Django

When redirect a user after she submits data in the Django view by returning a HttpResponseRedirect object, I always use request.path as the destination. return HttpResponseRedirect(request.path) The problem is request.path returns the full path to the requested page, but not including the parameters (and the domain), so it will be annoying if I employ a pagination mechanism for the view. For example, if the user is on page 2 and submit data: http://mydomain.com/ myview/?page=2 print request.path /myview/ So the user will be always redirected back to the first page. In this case, if I want to redirect the user to the page before she submits data, I need to use this as the destination instead: request.get_full_path() request.get_full_path() will return the full path (exclude the domain) along with the parameters (page=): print request.get_full_path() /myview/?page=2 Another note is that you must call get_full_path with a parentheses: ... return HttpResponseRedi

Add static pages to your moodle (2.7)

To add static pages to your Moodle (2.7): 1. Install this plugin (Addon): Github repo:  https://github.com/moodleuulm/moodle-local_staticpage Moodle plugin page:  https://moodle.org/plugins/view.php?plugin=local_staticpage 2. Create a directory to store your static pages, by default it is: /var/www/moodledata/staticpage set the correct permission for that folder: $ sudo chown -R www-data:www-data /var/www/moodledata/staticpage 3. If you want the users to login before they can see those static pages, modify this file: /var/www/moodle/local/staticpage/view.php as following: ... // Require login if Moodle is configured to force login //if ($CFG->forcelogin) { //    require_login(); //} require_login(); ... 4. Clean URL for your static pages: By default, the static page can be access via this URL: http://yourdomain/local/staticpage/view.php?page=yourpagename To make it pretty like this: http://yourdomain/static/yhourpagename.html add this rewrit